
News
3D Printing with TPU: Exploring the Advantages and Limitations 0
The 3D printing industry has come a long way since its inception. With the advent of new materials, it has become possible to print objects with diverse properties, including elasticity and flexibility. One such material is TPU (Thermoplastic Polyurethane), a flexible, rubber-like material that is widely used in various applications. TPU is a perfect material for 3D printing, as it combines flexibility with durability and can be used to create complex shapes that are not possible with other materials.
Advantages of 3D Printing with TPU
-
Flexibility and Elasticity: TPU is an excellent material for 3D printing, as it provides flexibility and elasticity to the printed object. This flexibility is useful in creating objects that require shock absorption or compression, such as phone cases, watch bands, and shoe soles.
-
Durability: TPU is a durable material that can withstand wear and tear, making it ideal for creating functional parts such as hinges, seals, and gaskets.
-
Versatility: TPU is a versatile material that can be used to create a wide range of objects, from functional parts to artistic sculptures.
-
Compatibility with FDM printers: TPU is compatible with FDM (Fused Deposition Modeling) printers, making it accessible to a broad audience of 3D printing enthusiasts.
-
Easy to print: TPU is relatively easy to print compared to other flexible materials, and it does not require a heated build plate, which makes it easier to work with.
Limitations of 3D Printing with TPU
-
Difficult to print: Despite being easier to print than other flexible materials, TPU can still be challenging to work with. It is prone to warping and stringing, and the extruder needs to be calibrated precisely to avoid clogging.
-
Limited precision: TPU has limited precision, which means that it is challenging to print small and intricate details accurately.
-
Limited color options: TPU is available in limited color options, making it difficult to create multicolor objects without painting or post-processing.
Tips for Printing with TPU
-
Use a direct drive extruder: TPU requires a direct drive extruder, as it is too flexible to be printed using a Bowden extruder.
-
Slow down the print speed: TPU requires a slower print speed than other materials, to avoid warping and stringing.
-
Adjust the retraction settings: Retraction settings need to be adjusted carefully to prevent the material from getting stuck in the extruder.
-
Use a high-quality filament: TPU quality can vary widely, so it is essential to use high-quality filament to ensure a successful print.
Conclusion
TPU is a versatile and flexible material that provides numerous benefits for 3D printing. While it has some limitations, it is still an excellent material for creating functional parts and artistic sculptures. Printing with TPU requires patience, practice, and the right equipment, but with the right techniques, it can yield impressive results. As 3D printing technology continues to evolve, we can expect to see more innovations in TPU materials and printing techniques.
- DigitMakers Team
Guide for FDM 3D Printing Material 0
3D printing has revolutionized the manufacturing industry, and the use of plastic as a printing material has been a significant contributor to this change. There are several types of plastic materials used for 3D printing, each with unique properties that make them suitable for different applications. Here, we will discuss the most commonly used types of 3D printing plastics, the best printing temperatures, the recommended bed and nozzle temperatures, and print settings for each.- DigitMakers Team
- Tags: 3d filament 3d printing abs petg pla
Printing with PETG 24
Printing with PETG (Polyethylene Terephthalate Glycol) filament has become increasingly popular among 3D printer enthusiasts due to its versatility, strength and durability. PETG is a thermoplastic that can be easily molded and extruded when heated, making it an ideal material for 3D printing. In this article, we will go over the best settings for printing with PETG to help you achieve high-quality prints every time.
- Bed Temperature: A bed temperature of around 70-80°C is ideal for printing with PETG. This temperature range helps the filament adhere properly to the bed and prevents warping, which can be a common issue when printing with PETG.
- Nozzle Temperature: Nozzle temperature is one of the most important settings when it comes to printing with PETG. A temperature range of 225-235°C is recommended for most brands of PETG filament. However, you should always refer to the filament manufacturer's recommendations as different brands of PETG filament may have different temperature requirements.
- Print Speed: The print speed you choose will largely depend on the complexity of the object you are printing. For smaller, simpler objects, you can print at a faster speed. For larger, more complex objects, a slower print speed is recommended to help ensure the filament has time to cool and prevent any defects from forming. A speed of 40-60mm/s is a good starting point for printing with PETG.
- Cooling: Proper cooling is crucial when printing with PETG. This material requires adequate cooling to prevent warping and other defects from forming. A fan should be used to cool the object as it is being printed, and the fan speed should be adjusted depending on the complexity of the object being printed.
- Retraction: Retraction is the process of pulling the filament back into the hot end to prevent stringing, which can be an issue when printing with PETG. The amount of retraction you use will depend on the brand of filament you are using, but a good starting point is around 4mm.
- Bed Adhesion: Bed adhesion is another important factor when printing with PETG. A properly calibrated bed and high-quality adhesion material, such as painters tape or hair spray, is recommended to help the filament stick to the bed and prevent warping.
In conclusion, printing with PETG is relatively easy, but it requires a careful balance of temperature, speed, and cooling to achieve high-quality prints. By following the recommended settings outlined in this article, you can be confident that your prints will be successful every time. Of course, as with all 3D printing, it is always a good idea to do some test prints before diving into a larger project to fine-tune your settings to your specific printer and filament.
- DigitMakers Team
- Tags: petg
3D Printing Process Glossary 0
Many Terms are used in 3D printing Processes the following list of the most common terms that are used.
- Bed Adhesion: The process of attaching the first layer of a print to the build plate.
- Build Plate: The flat surface on which 3D objects are printed.
- Calibration: The process of adjusting the printer to ensure accurate and consistent prints.
- Filament: The material used in fused filament fabrication (FFF) 3D printing, which is fed through a heated extruder to form the object.
- Extruder: The component of a 3D printer that melts the filament and deposits it layer by layer.
- FDM (Fused Deposition Modeling): A type of 3D printing technology that uses melted filament to build objects layer by layer.
- G-Code: A set of instructions used by 3D printers to control their movements and extrude filament.
- Infill: The interior structure of a 3D printed object, which can be customized to balance strength and cost.
- Layer Height: The thickness of each layer in a 3D printed object, which affects the surface smoothness and print time.
- Nozzle: The small opening in the extruder through which the melted filament is deposited.
- Overhang: A section of a 3D print that extends beyond the previous layer without support.
- Raft: A flat layer of material, often made of the same filament as the main print, that is added to improve bed adhesion.
- Resolution: The level of detail in a 3D print, often expressed in terms of layer height.
- Retraction: The process of pulling filament back into the extruder to prevent stringing and improve printing accuracy.
- Slicer: A software program that takes a 3D model and converts it into the G-Code instructions used by 3D printers.
- Support Structure: Temporary material added to a 3D print to support overhanging sections, which is later removed.
- Z-Axis: The vertical axis in a 3D printer, which determines the height of the layers being deposited.
Please Add more terms in the comments below.
- DigitMakers Team
Design for 3D printing 0
3D printing is a revolution in the field of manufacturing. With its ability to create complex shapes, designs and objects, 3D printing is being used in various industries such as medical, aerospace, and consumer goods. The success of a 3D print depends on the quality of the design, so it's important to have a clear understanding of the design principles for 3D printing.
-
File format: The most common file format for 3D printing is .STL. This file format is preferred because it can be easily read by most 3D printers and is easy to use for designing and prototyping.
-
Wall thickness: Wall thickness is an important factor to consider when designing for 3D printing. If the wall thickness is too thin, it may break during the printing process. On the other hand, if the wall thickness is too thick, it will increase the printing time and material usage. A minimum wall thickness of 1 mm is recommended.
-
Overhangs: Overhangs are parts of the design that hang vertically and are not supported by anything below them. 3D printers require support material to print overhangs, which can result in a rough surface finish. To avoid this, it's recommended to design overhangs with a slope of 45 degrees or less.
-
Bridging: Bridging refers to printing parts that span a gap without any material beneath them. Similar to overhangs, bridging requires support material, and the design should have a minimum thickness of 1 mm to avoid breakage during printing.
-
Printing orientation: Printing orientation can have a big impact on the quality of the final product. Printing in the correct orientation can reduce the need for support material, minimize warping and minimize the amount of material required.
-
Scale: 3D printing allows for precise scaling of designs, which can be an advantage or disadvantage depending on the design. The size of the print can affect the printing time and material usage, so it's important to consider the final size before starting the printing process.
-
Details: Fine details in the design may not be possible to achieve with 3D printing. The smallest details that can be printed depend on the printer's resolution, so it's important to consider this when designing.
In conclusion, 3D printing is a powerful tool for manufacturing and prototyping. By following these design principles, designers can create high-quality prints that are functional and aesthetically pleasing. With the right design, 3D printing can be used to create almost anything, from toys to medical devices, and more.
- DigitMakers Team
Craftbot 2 / XL - Pr3dator Motherboard Flashing Instructions 274
Craftbot 2 / XL - Pr3dator Motherboard Flash Firmware
The Following Instructions describe step by step how to Flash the PCraftbot 2/ XL Pr3dator Motherboard .
Flash the firmware should be easy and straightforward, but sometimes you face some problems and we are here to try to help you.
-
Go to craftware.com/firmware and look for your machine type at the top of the page.
Choose CraftBot (the right one)
Download the latest firmware file available into your computer. There is also a link to download the Software CRAFTPRINT. (Necessary to FLASH the firmware from your computer to the motherboard of your printer).
-
Download CRAFT PRINT and install it using the default settings.
-
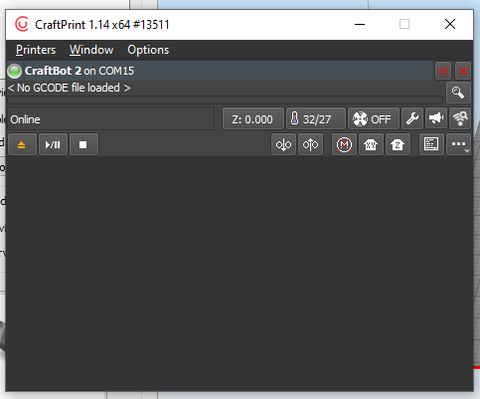
Open the CRAFT PRINT software and connect the USB cable from your computer and your printer. You should see a pop up message showing the connection port or if there is any error.
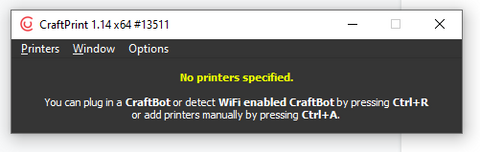
Press CTRL + R to detect a printer connected to your computer.
-
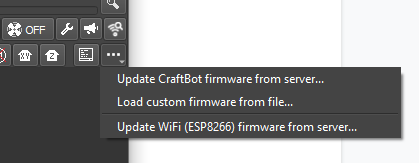
Once the connection is established, click on the … icon and choose if you want to update the firmware from the server or from a file previously downloaded.
-
Once you choose either way the software will automatically flash the firmware and will ask you to turn OFF your machine and wait for 5 seconds and then turn it ON again to complete the process.
-
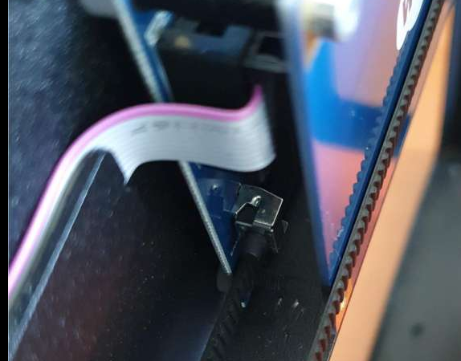
If you don’t get the instructions to turn OFF and ON your printer and the virtual LED shows BUSY (Yellow flashing) then...
you need to reset your LCD by pressing the small switch at the back of the screen from the right side.
-
Repeat the process and see if this time the process will go through until the end. If not you need to reset the mainboard and try again,
-
To reset the mainboard you need to turn off your printer, insert a small allen key into the hole near the USB cable and count 10 seconds, keep pushing the switch and turn ON your printer and then release the button
.


- Akshay Deep Singh